~Embedded Image Technique~
October 31st, 2010 by Holly McMillen
Hi Friends!
So this morning I got a wild hair and decided to clear my desk completely and start fresh. I am such a creature of habit, but I get so tired of stamping myself into a corner. You know what I mean…. you start out with a nice work area and by the time you’re down to assembling your card, you have about 4 square inches of space to work in. Gah! My son, Levi, came up and helped me. I moved everything and cleaned the desk top real good. I reorganized my nestabilities and ribbon basket (the ones that stay on my desk) and I finally moved my copic rack down onto the desk itself instead of on the shelf above. It feels and looks so good!
~*~*~*~*~*~*~*~*~*~*~*~*~*~
I have exciting news to share!! The There She Goes design team is growing! As of today, we have our very first TRENDIE ~ Christine Okken (otherwise known as ChristineCreations). Please help me welcome Christine by popping over to her blog CHRISTINE CREATIONS and leaving her some love!
~*~*~*~*~*~*~*~*~*~*~*~
For today’s Technique Lovers Challenge, we’re going to do something I stumbled upon. I don’t know if someone else has done this before and named it something else. I tried searching for it online and on SCS, but nothing came up. So, I’m claiming it as my own…. so there :).
I am calling it the Embedded Image Technique. It’s really simple to do and I love the result. Here you go:
Embedded Image
Supplies needed:
Cardstock – light colored
Versamark
Clear embossing powder
Darker colored embossing powder – depending on image you choose
Script stamp or tight patterned background stamp
Silhouette type image stamp
Heat gun
Step 1:
Stamp your script or tight patterned background stamp on light colored cardstock (I used white, but you could use vanilla or even a pink or light blue).
Step 2:
Holding your versamark pad side down, apply direct to paper. I find it helpful to go in one direction, then turn the paper 90 degrees and go across again.
Step 3:
Apply a generous amount of clear embossing powder. Shake excess loose. Heat set. Allow to cool (this only takes a few seconds to a minute), then repeat Step 2 and 3. Repeat a third time. You will now have a very shiny image with a nice thick coat.
Step 4:
Ink up your Silhouette type image and stamp on top of the clear embossed piece.
Step 5:
Apply darker embossing powder (anything from black , red, green, gold, etc will work).
Step 6:
Heat set your silhouette image and watch it magically embed into the background!
Step 7:
Cut or die cut your image and make it into a card or project!
***** I tried this with UTEE first and it was harder to get a clear image, but it may have been the broad silhouette stamp I used.
Here is my result:
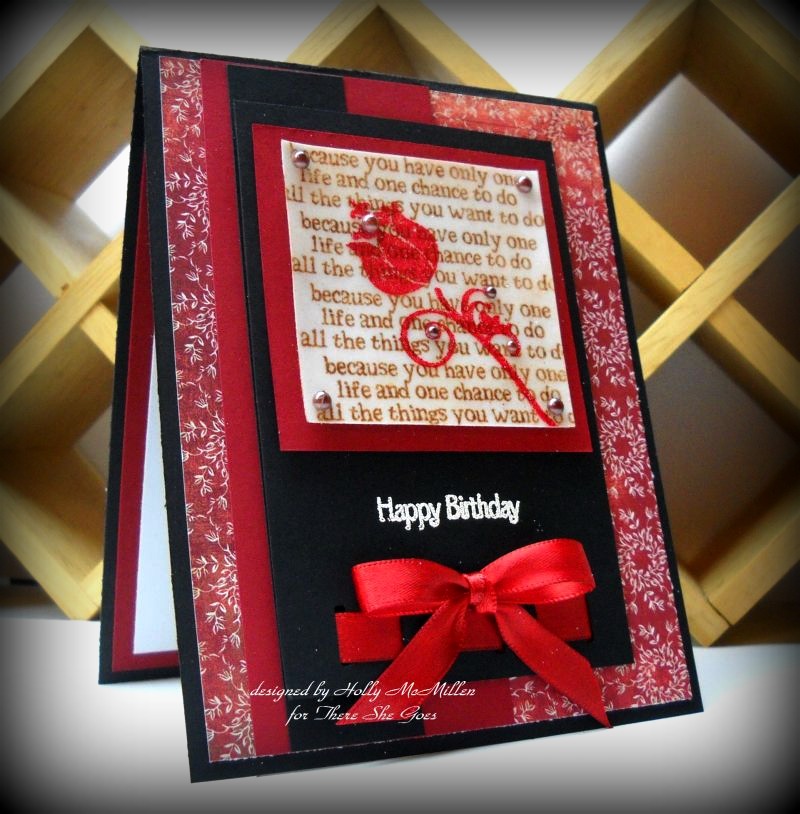
I gave this to my grandmother for her 94th birthday 🙂
Here are my deets:
Stamps: There She Goes’ Dream Big and There She Goes’ Spread Your Wings (sentiment), Cupcake Mix n Match (sentiment – Happy Birthday)
Colors: Cherry Cobbler, GP White, Basic Black, Basic Grey dp
Ink: Tim Holtz Antique Photo, Tea Bag, Versamark
Accessories: 1/2″ red satin ribbon, brown 1/2 pearls, ribbon threading punch, clear embossing powder, red embossing powder, white embossing powder, sponge
~*~*~*~*~*~*~*~*~*~
Thanks for stopping by! If you get a chance, pop on over to the Challenge forums on SCS and join in our fun!
Hugs!
Holly


[…] You can either download the word.doc I've attached here or you can view the step by step on my blog HERE. Here is my sample: ~ A Red Rose for Granny ~ Please remember when uploading to include the […]
Oh, I am excited to try this technique. Your card is lovely.
I had to laugh….I am using the 4 inch space in my work room, too. I plan to clean and rearrange tomorrow. You gave me encouragement….to get er done. I laugh though…..I thought I was the only one who used that small space.
Stunning! Great technique!
Happy Birthday to your grandma! Hope she has many more!!
Hi, Holly, your card for the Technique Challenge is lovely. And I am so glad that I hopped over to read about that 4 sq in space we work ourselves into…so true, it hurts!
Glad to hear that you are clean again….for awhile, for awhile!
Have a great week.
Way cool technique, Holly. I’m sure your granny loved it 🙂 Glad to hear your area is all nice and tidy too.
Great idea. How clever of you to think of this. The card is so vibrant in the color combo you chose.
Well, aren’t you the clever one! I love your beautiful card and I bet Granny did too!
I know just what you mean about the four square inches of work space. I was working in that much space myself yesterday! Love the technique. I don’t have to go to work until around noon today, so I’m definitely going to try this technique this morning. Thanks. Love your card.
Very cool technique Holly. I don’t think I have ever seen this technique before either.
Your card is just lovely! TFS!
Super beautiful and what a fabulous technique Holly!
Holly, I can’t wait to try this…..what fun! THX, GF!
How creative!!!! Hope I get a chance to try this today! My craft table looks like you described except I think I may have 2″ of space! Thanks for the challenge and the directions.
Very interesting technique. In Step 4 when you ‘ink up’ your silhouette style stamp, is that with Versamark again? Then you use a colored embossing powder on it. So, when you heat-set the image on top, does it seem to ‘sink’ down into the multiple layers of clear embossing? That is what it sounds like you are describing. Will definitely have to keep this technique in mind and give it a try. 🙂
Great technique Holly! can’t wait to give this a try!
Wow! What a great technique to come across. Can’t wait to give it a try.
Now about that 4″ work place……I too am there. Gets so crowded sometimes, I have to move to another table to finish. hehe Not really, but it gets pretty tight. Think it is time to re-organize and “toss” a few things. I am really bad at tossing things. Oh well.
Thanks for the challenge today! :0)
what a cool technique! can’t wait to try it!!!
FABULOUS, Holly!!!! I LOVE this super cool technique and your card is gorgeous!!!! I will give this a try tonight!!!!
Love the card. Can’t wait to try it.
I had to laugh. I have been begging my husband to help me clean out a little bed room we have that is full of stuff our boys have outgrown like toys. I want to get rid of all of it and he wants to save all of it. This is going to be my craft room. So, since I have no where else to work, I gathered up all my supplies to make Halloween and Thanksgiving cards and started working on the dining room table. Well in no time, you guessed it, I only had 4 inches of work space. So frustrating. I finally had to put it all away so we could have Sunday dinner at the table!
WOW! What a stunning technique. LOVE IT! Will HAVE to go try it ASAP. Wish I could say NOW, but have to get my kids to school, and go to the doctor and then I hope I can try it.
THANK YOU!!
Wow. Great technique and instructions that yields a fabulous result. I’m going to give this a go!!!
AMAZING! I can’t believe I can do this..but I’ll sure try!
Wow! Fantastic technique. I will definitely give this a try. I’ve not done many items with gloss, but I’ve wanted to learn more about it. There’s no time like the present. Love your card, too. Hugs, dj1952
This is absolutely beautiful! I have seen something similar and it’s called cracked glass. You do exactly what you’ve done here, but you put the multi-layered embossed piece in the freezer for about 5 minutes, take it out and bend it to create a shattered/cracked glass look and then ink with a dark pigment to pick up the lines. I haven’t seen it done this way though and I’m going to try it now! Thanks so much for the inspiration. 🙂
I love your blog, you should add an RSS feed feature so I can get automatic notifications of new blogs. If you set one up please email me! i will bookmark you for now. Again Excellent Blog!
Expresses its appreciation for such a great article, it is excellent, very rich. As a first time visitor to your blog, I am very impressed.In your article, I found a lot to learn. Keep it going.Thank you.
Your thinking is very special, like your article and look forward to more exciting content , thank you.
The idea very innovative! Do you know how to keep the attraction of the readers. Your wisdom and your video between, I was almost moved to start my own blog (well, almost… ha ha!) Good work. I really like what you had to say, more important is, how you take it. Cool!
Oh, oh, oh, this is a very good position. In concept, I hope this written submit additional time-it and accurate efforts to become an excellent article… But what can I say… I delay a lot, in any case, seems to be doing a thing.
http://www.oakleysunglassescheapoutlets.com
Why is this? Because the lower rectum and anus are concentrated with blood vessels. By exercising regularly, it is possible to increase blood flow to that area and decrease the chances of formation of hemorrhoids and piles. Of course, hemorrhoids are formed thanks to the inflammation of blood vessels in the anal region. As a person gets up in years, veins and arteries lose elasticity. Increased blood flow to these vessels can negate the poakley sunglasses for women