~ New Beginnings ~
January 4th, 2010 by Holly McMillen
Good morning, Friends!
Today is my first official day as the Hostess of Splitcoaststampers Technique Lover’s Challenge! I’m excited! Are you??? 🙂
I have a pretty good list of things for us to try out in the next few months. I am adding to that list daily, too! If you have any suggested techniques to try, please e-mail me or PM me on Splitcoaststampers. I will entertain all ideas!
Have you ever noticed that a lot of paper crafters are also quilters? Well, for today’s Technique Lover’s Challenge, we are going to do some paper quilting! There are a couple of ways of doing this.
Option 1: Take a piece of cardstock slightly larger than a die cut you choose. For instance, let’s say you wish to use a label 8 nestie. Cut your piece of cardstock (white is fine, but any scrap piece would work too as you will be covering it up. Now, cut several 1 1/4″ x 1 1/4″ pieces of coordinating designer paper. Draw a line across the center of your cardstock for a guide and begin lining up the pieces along the line, alternating patterns. Then add more above that line, offsetting each piece as shown in this diagram:
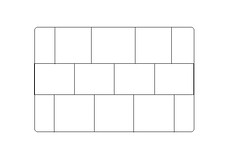
When you have attached all the pieces, run the finished piece through your die cut machine with the nestie and you’re done!
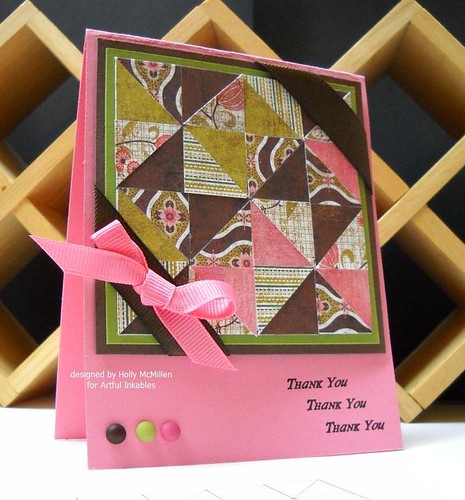
Option #2: Create a pattern with alternating pieces of designer paper and solid paper. I did this one for my example. I did a little research and you can find tons of quilt patterns online. Here is one site that has a good variety.
I used this pattern for my ”quilt”:
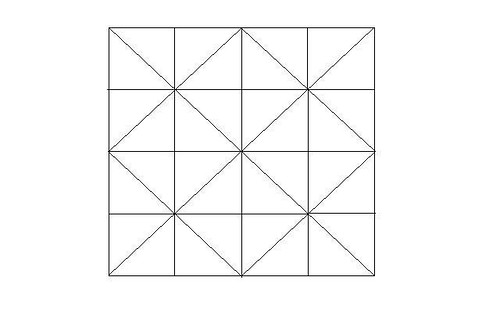
Since it is a easy pattern, it was quick. I cut one piece of white cardstock at 3 1/2″ square. Then I took a ruler and drew lines from corner to corner, then across and down. Then I did that again with each of the smaller square it created. I chose several different patterned papers and solid papers and cut them into 3 1/2″ squares as well. I cut them in triangular pieces by cutting from corner to corner and then cutting each piece in half until I had really small pieces. Then I adhered them to the first piece that I had drawn the pattern on, creating a pattern.
There are so many options for this! You can use squares and stamp “inchies” in them. You can do just about anything your imagination will allow!
Here are my deets:
Stamps: Artful Inkables‘ Basic Sentiments
Colors: Regal Rose, Chocolate Chip, Old Olive, GP White
Ink: Versafine Black Onyx
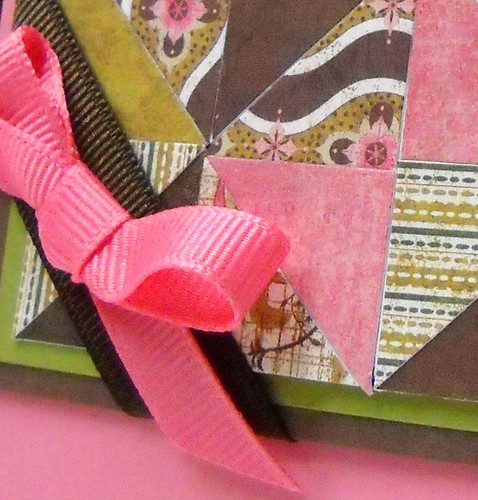
Accessories: ribbons, Candy dots, dimensionals
~*~*~*~*~*~*~*~*~*~*~*~*~*~*~*~*~*~*~*~*~*~*~*~
Thanks for stopping by! I hope you’ll pop over to Splitcoaststampers and play along! Have a blessed day!
~Holly~


Congrats Holly! I just saw your cards over on SCS and they are both fantastic!
Fabulously done, Holly!! Great idea and wonderful instructions too. Trusting you had a fabulous Christmas and cheers to a great 2010 😀
Congrats on stepping up and taking over the Technique Lovers Challenge. You will be FABULOUS!!!!!
I am a card maker, scrapbooker and a quilter. What you made are called “half square triangles” and yes, they make a great card!