~ There She Goes November Blog Hop Day 1 ~
November 24th, 2009 by Holly McMillen
Happy Wednesday, Friends!
It’s time again for the new releases from There She Goes! If you have arrived here from Gretchen’s blog, then you are in the right spot. If not, you may wish to start back at Faith’s blog to get the full show.
A couple of days ago, I posted a project I did (Snowman Tower). I had such a wonderful response to it both here and on Splitcoasters, that I promised to post a tutorial on how the towers are made. Today’s tower is a Santa!

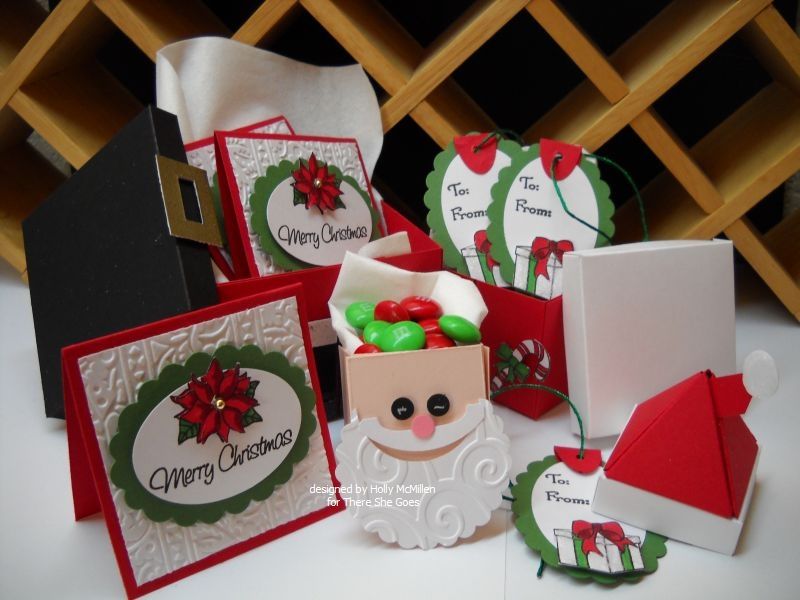
I used the new Holiday Tags set for this project.
For the body itself, you will need:
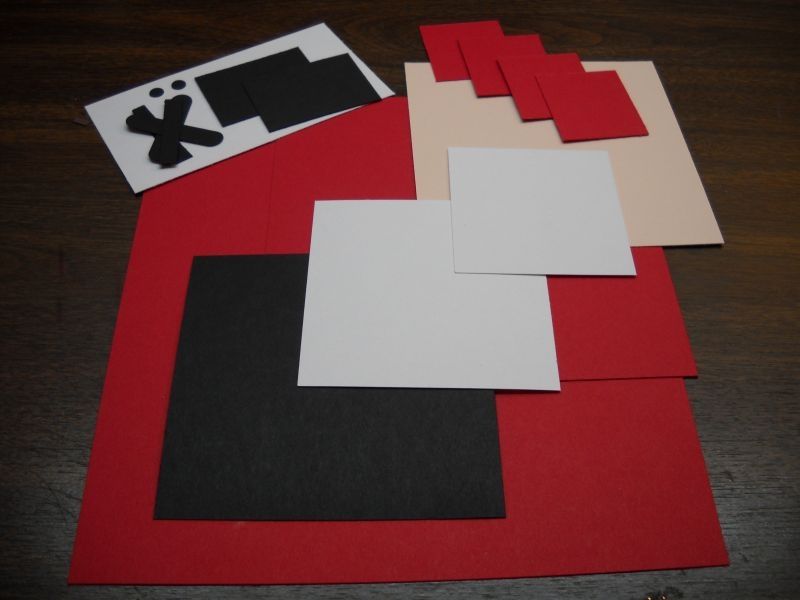
1 piece of Real Red cardstock measuring 7 1/2 x 7 1/2″ ~ score at 2 1/4″ on all four sides
*lid – 1 piece of basic black cardstock measuring 4 x 4″ ~ score at 1/2″ on all four sides
1 piece of Real Red cardstock measuring 5 3/4 x 5 3/4″ ~ score at 1 3/4″ on all four sides
*lid – 1 piece of Whisper White cardstock measuring 3 1/2 x 3 1/2″ ~ score at 1/2″ on all four sides
1 piece of Blush Blossom cardstock measuring 4 1/2 x 4 1/2″ ~ score at 1 1/2″ on all four sides
*lid – 1 piece of Whisper White cardstock measuring 2 1/2 x 2 1/2″ ~ score at 1/2″ on all four sides
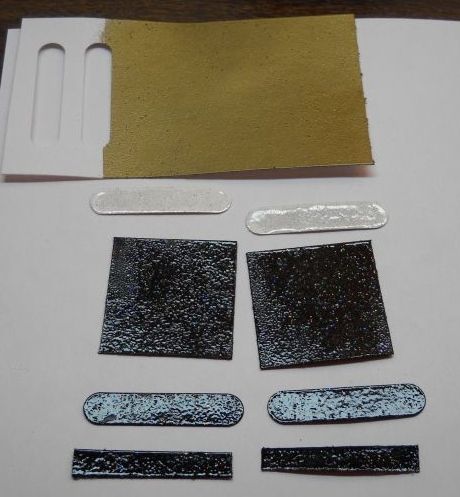
Step 1: Cut the pieces as shown in the following pic. Apply sticky tape to the tabs and form the box bottoms and tops.

(Note: Before you form the middle box, take a ruler and black sharpie and draw a line down the center of one side)

Boots:
You will need:
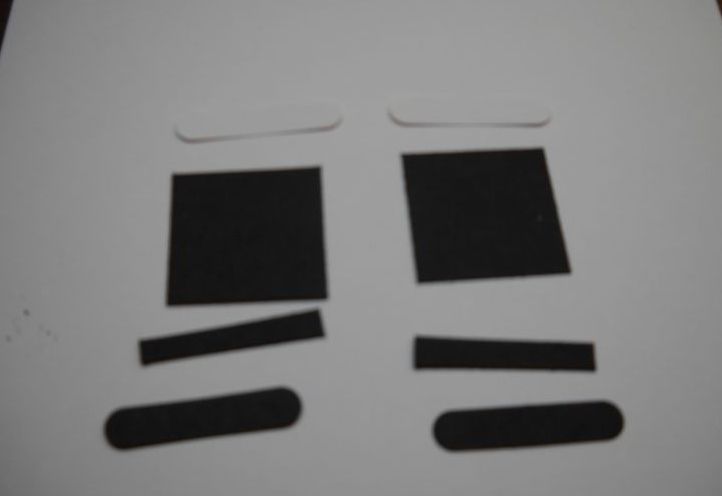
2 – 1 1/2″ square pieces of basic black cardstock
2 – Whisper white word window punch outs
2 – Basic Black word window punch outs
2 – 1/4″ x 1 3/4″ strips of Basic black cardstock
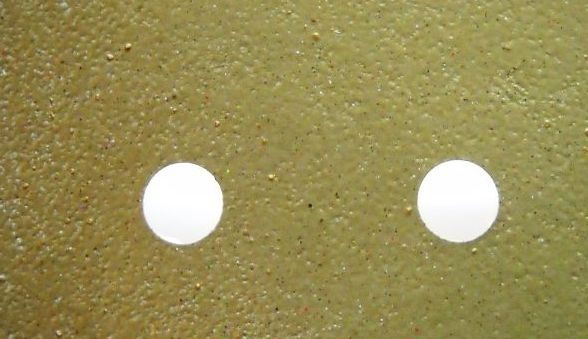
2 – Gold* circles
*to create the gold circles, use a large (1/4″) hole punch on a piece of gold embossed paper. Then use a 1/2″ circle punch
around the hole created. (See reference pic).
Versamark
Clear embossing powder
White embossing powder
Gold embossing powder
For this boots, cover the black pieces in versamark and emboss with clear embossing powder. Cover the white pieces in versamark and emboss with white embossing powder.
To assemble:
Take the 1/4″ strips and apply sticky tape. Attach them to the black word window punch outs. The word window punch out will be longer than the strip. Snip the end off to make it square. Remember, you will want to do this on opposite sides of these two pieces as the boots face away from the center.
Attach the white word window punch outs to the top of the 1 1/2″ squares with sticky tape. Snip the end of one side so that it is squared. Do the same to the other side (on the opposite side).
Attach the boot bottom to the 1 1/2″ square with sticky tape. Attach the gold circles by folding in half and wrapping around the outside of the boot. Then attach the boots ~ back to back ~ onto the largest box bottom.
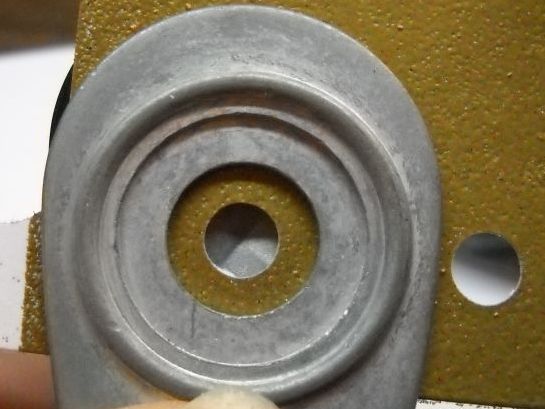
For the center box:
From the piece of gold embossed paper, punch three 1/4″ circles (I used large hole punch). Attach those along the line you drew.
For the “FACE”:
Using a small scalloped circle punch, punch a piece of white cardstock. Take the scalloped circle and place it into your 1 3/8″ circle punch so that six of the scallops show and punch. This will create the beard shape. I have put my beard through the cuttlebug with the swirls embossing folder to give it texture.
For the moustache, using the round tab punch, punch out a shape of Whisper White cardstock. Take the piece you punched out and turn it sideways and place back into the round tab punch at the top. You should only see about 1/8″ of the piece when looking through the back of your punch. That creates your moustache.
The eyes are created using a 1/4″ hole punch on basic black. The nose is the 1/4″ hold punch on pretty in pink.
Assemble your face on the front of your Blush blossom box. (Note: I put the top on the box first to insure that the placement is correct)
For the HAT:
You will need 4 – Real Red cardstock pieces cut 1 1/2″ x 1 3/4″, a large photo corner in Real Red and two 1/2″ white circles
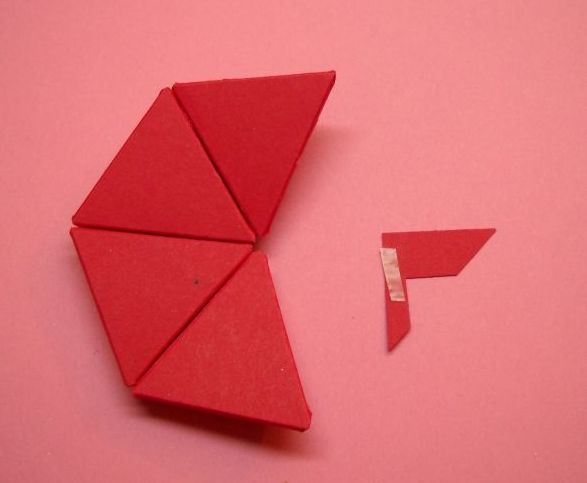
On the 1 1/2 x 1 3/4″ pieces, score the 1 3/4″ side at 1/4″. Along the opposite end, find the center (3/4″) and make a tick mark. Score each piece as shown below: (I have drawn the lines on one so you can see what I am talking about)
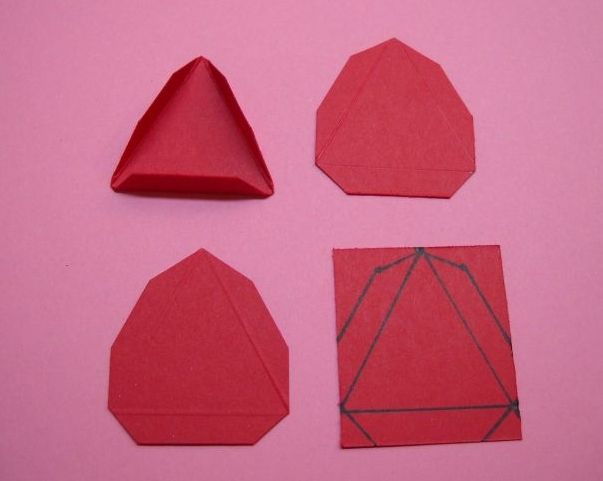
Fold the side tabs in on each piece and apply sticky tape. Adhere them together, carefully lining up the edges. Before you attach the last two together, insert the large photo corner as shown. I cut off on side of the photo corner as seen in the photo to make it fit easier.
Now apply sticky tape to the bottom tabs and carefully adhere to your smallest box top. The white circles are the pom pom on his hat.
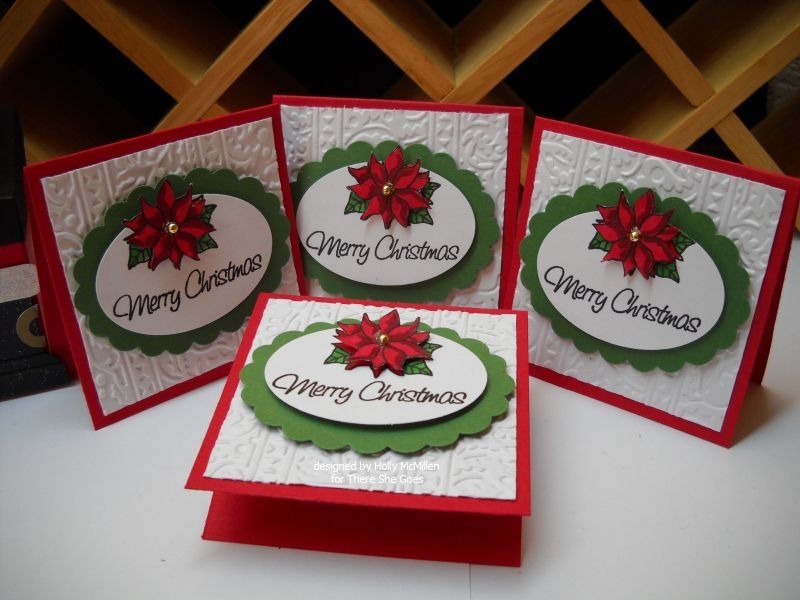
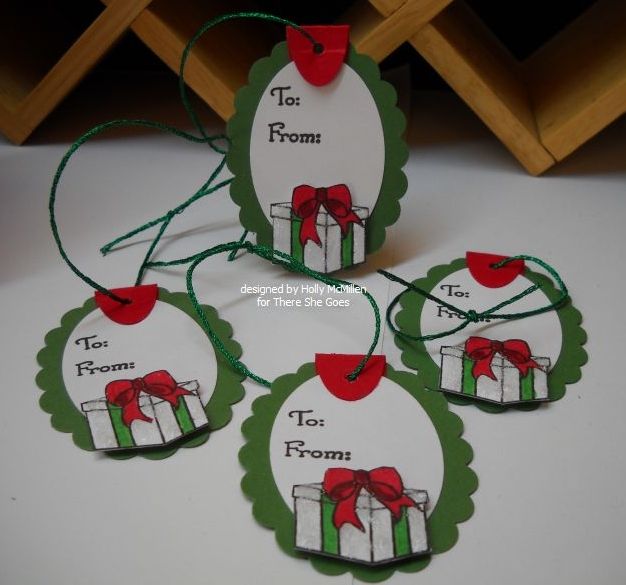
As with the snowman tower, I created mini cards and tags to go inside the two bottom boxes and stuffed candies in the top box. You can use your imagination for that part! 🙂
Here are my deets:
Stamps: There She Goes’ Holiday Tags
Colors: GP White, Real Red, Basic Black, Blush Blossom, Pretty in Pink, Garden Green
Ink: Versafine Black Onyx, copics, black sharpie, white gel pen, Versamark
Accessories: gold 1/2 pearls, cord, scalloped circle and oval punches, 1/4″ hole punch, 1/2″ circle punch, word window punch, sticky tape, embossing powders, embossing folder, scoring blade, scissors, ruler, round tab punch, dimensionals, photo corner punch, circle punch (1 3/8″)
~*~*~*~*~*~*~*~*~*~*~*~*~*~*~*~*~*~*~*~*~*~*~*~*~
If you have ANY questions, please do not hesitate to e-mail me at [email protected] .
Now it’s time to send you hopping along! Head on over to Jackie’s blog and see what fabulousness she has to offer!
Thanks so much for stopping by. Remember, this is just day #1 of the three day hop. Stop back by tomorrow for some more fun!
Blessings,
Holly


Holly, this is absolutely amazing!!! Your project turned out so perfect and I love that you have a tutorial so that we can try it out for ourselves. Thanks for inspiring us 🙂
Holly, this is adorable!! Thanks for the tutorial…such great details to help those of us who are 3-D impaired!!
Like WoW! Thanks so much Holly for sharing a fabulous idea!
So cute! I love both the santa and snowman! Thank you for making a tutorial and sharing it with all of us. I might try to make one in between prepping for Thanksgiving and work. Thanks again!
very nice! I like this project
Oh, My Gosh!!! This is adorable! Just love the Santa! And the stuff inside is so cute! Thanks so much for the instructions!!!! I’m saving this in my favorites and will give it a try!
I absolutely love your project!!! Sooo cute!
Thanks for sharing the tutorial Holly! Great project!
AAAAHHHCK! How adorable is that?? Thanks for sharing how you did this!
oh wow Holly this is amazing! Everything is fabulous, the tags really popped out to me and that santa is just amazing.
These are fabulous! Thanks for the instructions! {SMILES}
How fantastic are all of these! You are super creative!! Love the colors and the santa. The embossing looks great and I love your coloring.
Holy guacamole!!! You have been VERY busy!! These are all AMAZING Holly!! LOVE the Santa box!
Do you have the instructions for the Snowman Boxes they are soooo cute!
What a great Santa and the cards are lovely!
You are on fire, Holly 😀 Just love what you’ve done here and thank you for taking the time to put together such a wonderful tutorial on how you created this! Love the embossed beard and the cards and tags are wonderful. Fabulous job!
Awwww How cute. Thank you for the detailed tutorial.
That santa is the cutest thing I’ve seen! What a great idea! Hop Hop Hop
Wow! Great tutorial! Awesome tags!
Fantastic! Thank you so much for putting so much time into that tutorial — you are so detailed!
The Santa is beautiful!
Oh my gosh! How cute is that?!? Holly, this is incredible and a fabulous tutorial to boot! Love it!
What a fantastic project! Love it!!
What amazing projects!!! I’ll have to give this a try. Thanks for sharing the how to.
Awesome job! Thx for the tutorial!
Holly!!!
Holy macaroni! What a project. I love the tags you created but the Santa box is not only amazing but adorable. Thanks for the great tutorial too! What a special added bonus!
-michele
ADORABLE, thanks for the instructions. hugs..
Oh my goodness, Holly! Your project is absolutely amazing! Thank you for taking your time to put the wonderful tutorial, too! I think this is going to be a wonderful project with my daughter :):)
What a great project, Holly. I will be making one of these for sure. Thank you so much.
fab work
WOW Holly! You have certainly given us an eye full! Thanks for the cool tutorial (and those adorable Merry Christmas cards! So sweet!) Happy Thanksgiving!
GASP!!!!! This is one FANTASTIC project!!!! I’ll have to print it out and make one of these for a Christmas gift…LOVE it, Holly, and thanks for all the wonderful instructions!!!! Your cards and tags are wonderful, too!!!!
Wow, thank you so much for the tutorial, so cute! The card was beautiful and loved the tag with the popped present!
WOW! I can see why the response was favorable, your Santa Tower is really cute
What a lovely project, it is so much easier for me when I can follow something, Thank you,
Rene from OZ xo
HoHoHo! I don’t think this could be any CUTER! I am SO grateful for the tutorial! Thanks for the ingenius idea and for spending the time it took to share it! {{hugs}}
I am really enjoying reading your well written articles..
It looks like you spend a lot of effort and time on your blog. it is so great,I am looking forward to your joining!